This article is about performing merging and splitting segments in OmegaT using a convenient groovy script.
Continue reading
This article is about performing merging and splitting segments in OmegaT using a convenient groovy script.
Continue reading
A quick and easy introduction to the OmegaT scripts:
scripts subfolder of the folder where OmegaT is installed. Often the installation is done in a location where a regular user doesn’t have write permissions, which means that adding and removing scripts can be complicated.

filename.groovy.txt, just remove the .txt part. If the file was saved in your Downloads folder, just move it to the folder set up for your scripts.


In my previous post, I shared a small script that selects the current source text in OmegaT. When OmegaT 5.8/6 is released, that script is not going to be needed: this function has been included in the program itself.
Enjoy!


There might be a number of situations when the whole text of the current segment’s source is needed for something other than translation itself: performing concordance or web search, writing a translation note in another application, asking your client or project manager about the text, etc.

Currently, in OmegaT it can be achieved in several fairly easy ways:
All that is fine, but it would be much nicer to have a simple shortcut to select that source text, similar to what Ctrl+A does (which in OmegaT Editor selects everything only in the target field, or the complete textual contents of other panes if the got focus). I’ve written a simple script that does just that, and though scripts can be bound only to Ctrl+Shift+F[1-12] keys, it’s better than not having a shortcut at all. Hopefully, this function might appear in OmegaT itself, but before it happened, here you have it:
Get it from SF.net
Get it from GitHub
To learn how to install and use OmegaT scripts, see this quick guide.
Happy selecting!

Going to the segment you need is quite easy in OmegaT (in most cases, but when it’s not, there is the wonderful scripting functionality).
Continue reading
As announced previously, an alternative glossary pane layout was made available as a plugin. The newest update (v.1.1.0) now includes 4 variants of that compact layout:
source: target [comment] | target [comment] | [comment] (separator | is styled as normal text — the same as in the original version)source: target [comment] | target [comment] | [comment] (separator | is styled as target terms)source: target (comment), target (comment), (comment) (separator , is styled as normal text)source: target (comment), target (comment), (comment) (separator , is styled as target terms)Once again, here’s the project itself, and here is where you can download the compiled version. If you run OmegaT on Java8, make sure to download the right build. On Java11 it doesn’t matter which build is used.
Comments, bug reports, complains, latest gossips and donations are always welcome.
Take care and good luck!

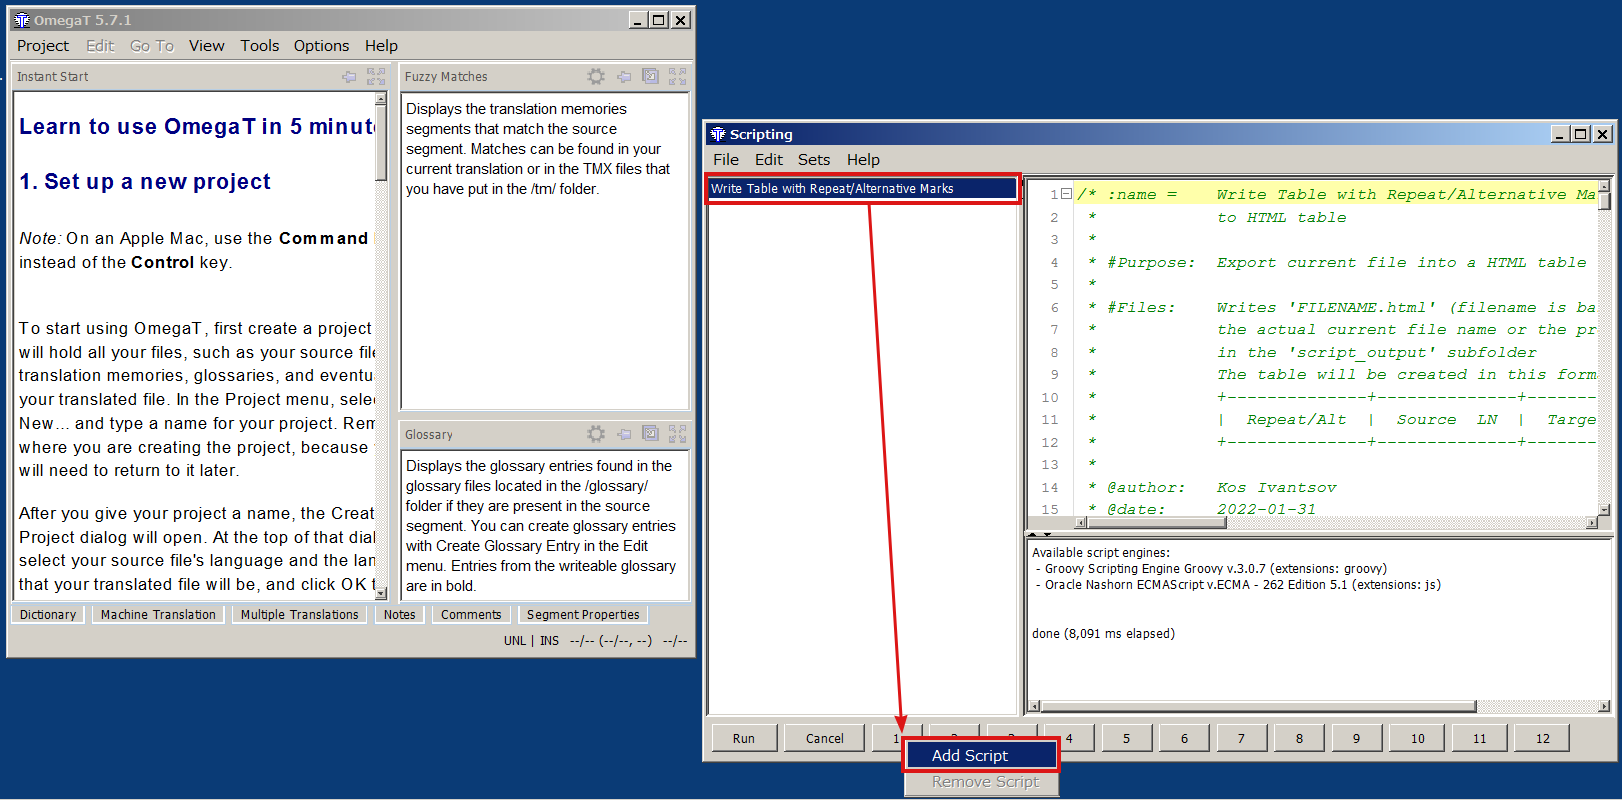
The earlier version of this script was described in this article. Here I’m announcing the update to the script which makes it possible to include:
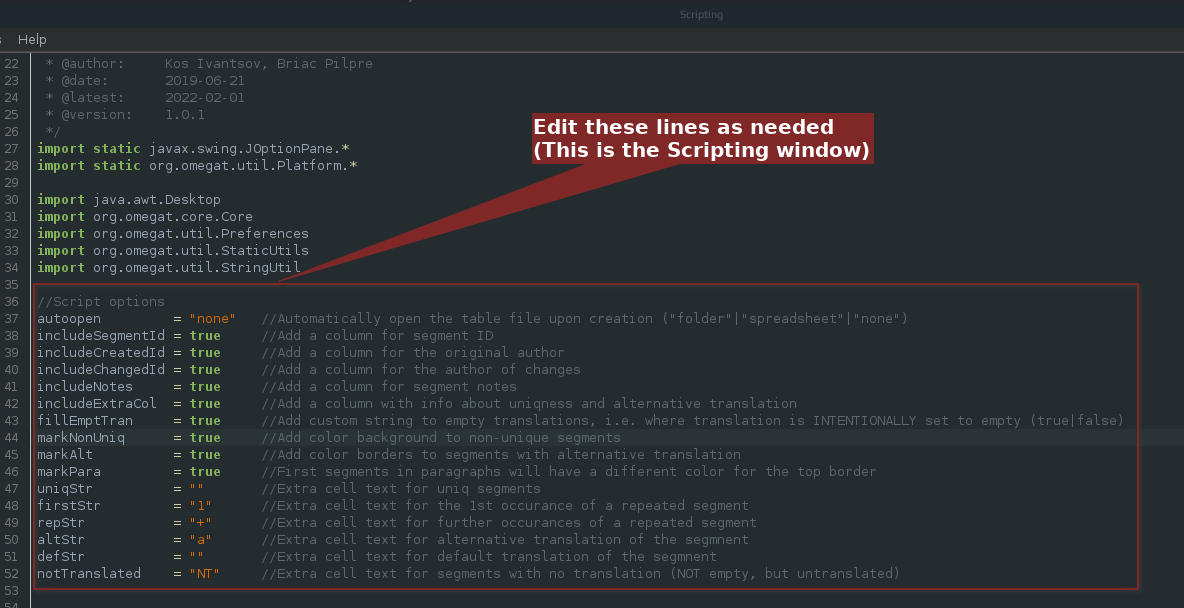
1 or + in the dedicated column: for the first occurrence, or further instances of the repeated segment, respectfully)a with a different background in the dedicated column)NT in the dedicated column) All of the above features are optional, though they are on by default. To disable or change them, editing the script is required, but all those lines are very easy to understand, they have comments, and are placed almost in the very beginning of the script:
Unlike the earlier version, the script produces the tabular output:
| Segment # | Source Text | Target Text | Uniq/Al | Segment ID | Creator | Changer | Note |
|---|---|---|---|---|---|---|---|
The script can be downloaded from
SF.net repository
GitHub repository
To learn how to install and use OmegaT scripts, see this quick guide.
Comments, suggestions, complaints, and donations are always welcome!
Happy spreadsheeting!

A few years ago I wrote a script that exported the whole OmegaT to an HTML table. I used it a lot myself, and I know quite a few other people found it helpful too. The problem with the table produced by that script was that it had no way to show repeated or alternatively translated segments. I’ve rewritten the script since, but never published an announcement about that new version. Now I did a few more changes, and thought that it’s about time to fix that omission.
Continue reading
It has been possible for quite some time now to choose which Glossary pane layout to use in OmegaT. Selection isn’t that great, only two layouts are provided: Default and Dictionary. But at the same time this feature had been introduced, it became possible to add custom layouts via plugins. I haven’t seen any, but the possibility is there. And just recently, Hiroshi Miura, a very prolific OmegaT developer, published a plugin skeleton just for this purpose. I used what he generously shared, and made an alternative compact layout for the Glossary pane.
It puts target terms right after the source term on the same line, and separates them only by a vertical bar and spaces. If there’s a comment for the term, it follows it immediately enclosed in square brackets. If OmegaT is set up to merge multiple target definitions for the same source term, and there are duplicated entries (i.e. two or more identical target terms for the same source term) with different comments, the comments will be separated by the vertical bar, but the term itself won’t be repeated.
To enable this layout in OmegaT, download the plugin (the ready-to-use jar is in the Releases section), put it into plugins subfolder in your OmegaT config folder, restart OmegaT, and select it under Preferences → Glossary → Glossary layout: → Compact Glossary Layout
Happy translating!

Over the years of my daily use of OmegaT (I started using it back in 2009), I helped quite a few translators to make their first steps with the program. The funny thing is that almost every time a new person tries to learn the program, we change some of the same defaults to make it more usable and comfortable. So I thought it might be a good idea to collect those few initial setup changes here as a small series of posts so that anyone could refer to them at any point.
The first thing I always have new users change is the Editor behavior.
Continue reading